|
The Mid-Derbyshire Light Railway was a child of the 80's - it originally opened on 21st August 1988 and operated successfully for a number of years, until other interests (like restoring a narrowboat) supplanted it in my affections. The fact that it got vandalised twice meant that I wasnt inclined to rebuild it again, but the footpath alongside the garden doesnt go anywhere any more because the canal bridge has been closed as unsafe, cutting off the escape route for the vandals. In addition, the spiky bushes I planted along the boundary fence have now grown sufficiently to carry out their secondary role of deterrent, so I felt inclined to make a fresh start.
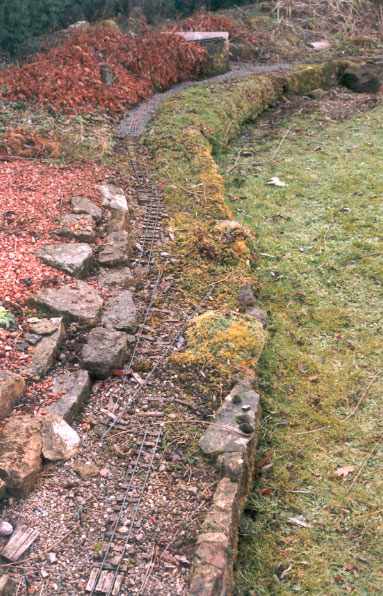
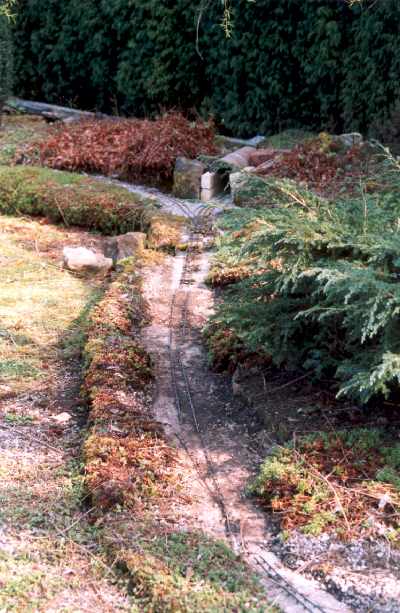
The first task was to actually clear the trackbed - three years of unpruned growth had overwhelmed the track in a good few places, but I was careful to not cut the overgrowth back too severely - people contrive to get this effect and Id achieved it naturally, so I didnt want to totally destroy it. When Id finished clearing (four BIG bags of greenery later) the news wasnt good. In most cases, the sleepers and battening had gone rotten, so there was nothing to hold the two strips of brass rail and the chairs apart at the right distance, so a re-lay of most of it is going to be called for. The ballast (being severely contaminated with soil and holding water) is also going to have to go: one section has remained dry and clear and may stand major fettling rather than a complete relay, but well see how we go with that.
The first bit to actually get dealt with was new construction: Id put in a turnout at one point on the main line last rebuild, with the intention of putting in a tunnel and another turnout immediately outside the station to create a return loop out of one half of my dogbone main line layout and I decided to start here. The first job was to remove the greenery from where the tunnel was going to go. A Big Bag later I was able to get in with the spade to remove the stone (not a lot of soil put in to start with - only wanted to grow plants where I wanted) down to below the level of the concrete track sub-bases at either end of the new stretch of track - only about a metre or so. Once this was done, a quick foray into the garage found some cement and there was a bag of sand lurking round the side of the garage next to a sheet of ply to mix on. All this got lugged down to the bottom of the garden and the new concrete track base got mixed and laid in short order.
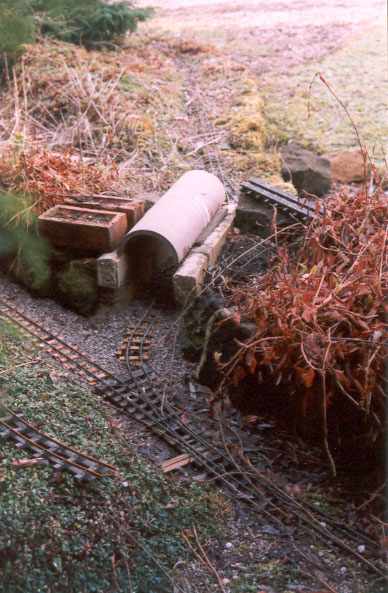
Materials for the tunnel sides and roof had to be cheap - were working on a shoestring here. My local B&Q came up with some concrete blocks intended for landscaping - only 3½" wide, 2½" deep and 11" long. Eight of these laid on edge (some cut in half) made up two walls 2 bricks long by two bricks high: my first attempt at bricklaying which went well enough. It wouldnt pass muster if it was going to be seen (the fact that one edge of the blocks, intended to be seen, was rounded didnt help) but it will serve my purpose well enough. The roof is arched. Ive obtained a half-drain-pipe: the sort of thing that lurks at the bottom of a drain inspection chamber and cut it down to size with an angle grinder.
Before that could be fixed in place, I thought it might be a good idea to lay some track........... Id got sleepers, chairs and rail in stock but no ballast, so I loaded some large empty plastic tubs into the back of the 2CV and headed off to Crich quarry - less than ten miles away. I got my last lot of ballast from here - I use their "less than 10mm" size and it comes dirt cheap for the amounts I buy. Its also quite nice to watch the trams going past! My request at the weigh house resulted in a ruddy great loading shovel trundling up to me, so I could fill the tubs from its bucket full of stone, using the shovel Id brought for the purpose. Once Id settled up, home to start track laying. Once Id sorted out clearances with my largest coach, the track went in relatively easily - the only problem was with end throw on the outside of the curve, rather than overhang on the inside. Once the track had gone in (including the second turnout) the ballasting was simple enough and the roof was then rested in place. It needs to be concreted in place but I havent had time to do that as yet.
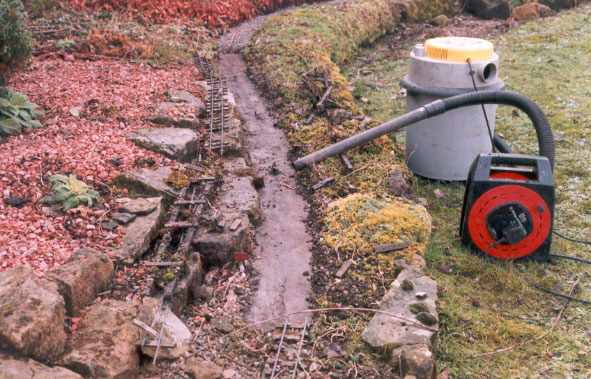
The new tunnel 28th November 2002 The last week or so has been a bit hectic chez Dominic. SWMBO fell down the stairs and broke her wrist on Saturday and the washing machine died at the same time, which means Im now doing more of the chores, including ambulance driver, chauffeur and signer of cheques. The new washing machine came today (my day off this week) and installing this cut into the time available for Other Jobs (including the railway). However, I did manage to get a spell in the garden in the afternoon. The first job was to clear the trackbed for about 3 yards: the industrial-strength vacuum cleaner I acquired from Mr Screwfix when I was doing the boat came up trumps here. Its Super Sucking Power meant that the old ballast disappeared in short order, leaving a nice clear working area, apart from the brass screws which had secured the battens in the days when football was played in the garden - now thankfully redundant.
Two-and-a-bit yards got relaid and reballasted.......... 25th February 2003 The spring-like weather of the last few days has tempted me into the garden to get on with re-laying. Sunday afternoon saw the first 3 yards or so relaid from the turnout to the new tunnel up to what will be Lathkill Dale (for Over Haddon) station on the "new" MDLR. I was aware of my rapidly-shrinking stock of sleepers, so Monday morning saw me on the phone to my favourite garden railway supplier in Norfolk. Unfortunately, theyre out of stock and will be for some time, so we may have a problem.
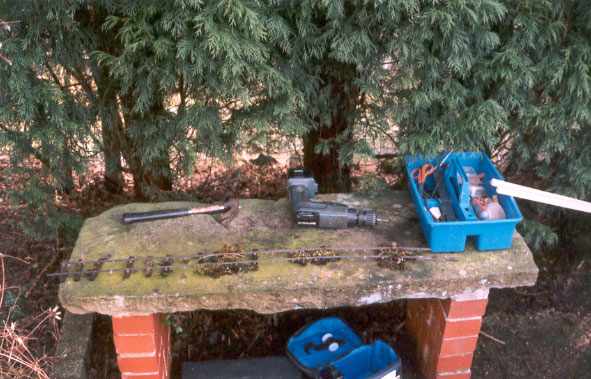
What's passing for a workbench (too lazy to get the workmate out). This afternoon was too good an opportunity to miss, so I got geared up and went down the garden again. The first job I did was to clear all the paths around the railway. These are out of view of the house so didnt get any maintenance when the railway wasnt in use. It was quite remarkable how much stuff was on them: I must go down with the pressure washer to finish the job off!
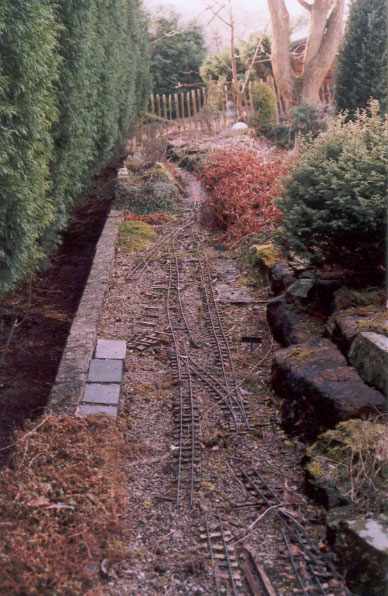
The next section untouched..........
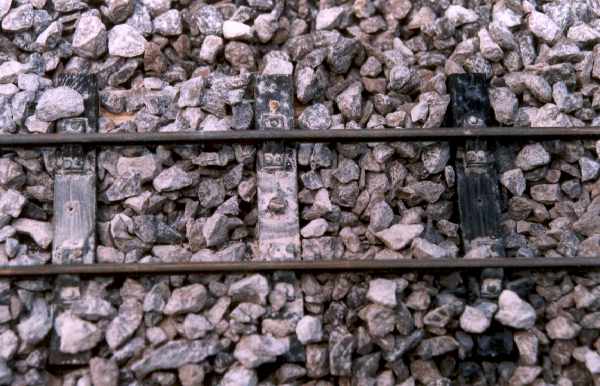
........ unballasted (note the reamains of the track on the left and the brass screws which were used to hold the battens down)..........
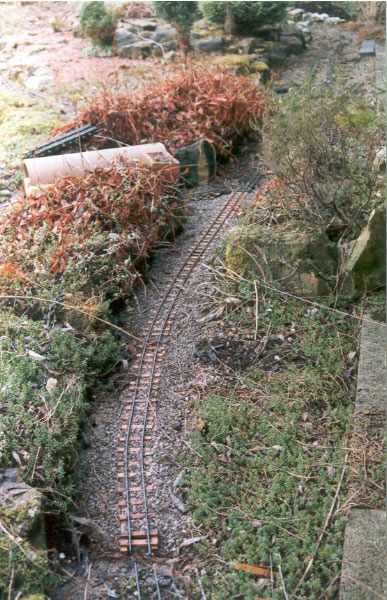
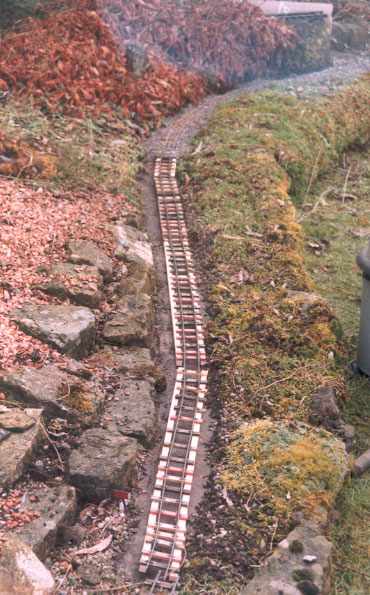
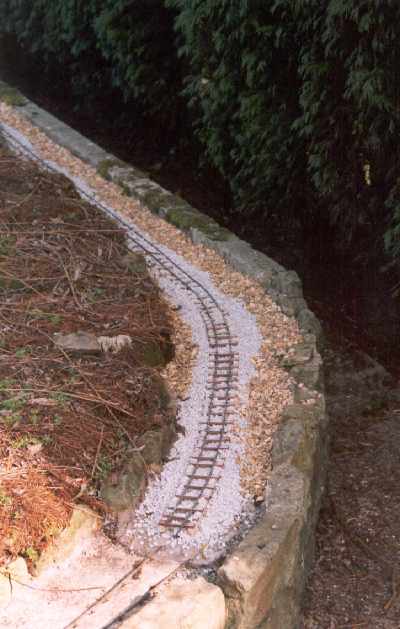
.......... re-sleepered, re-battened & relayed..........
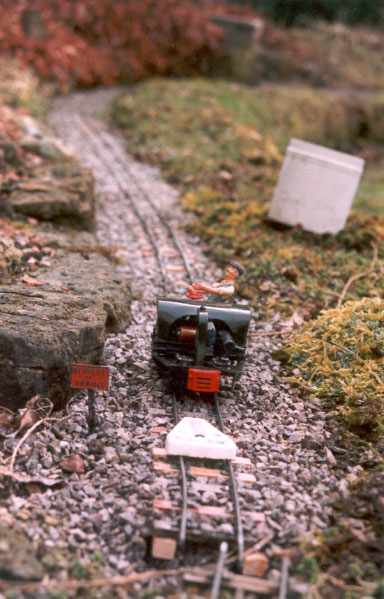
.......... and being inspected by Jarge on the bow-framed Simplex. The triangular "thingie" is my caravan levelling device - two bubbles at right angles and just the right size to sit on top of the rails. The stretch of track I did today was not as waterlogged as the other chunks Ive tackled, so there was some recognisable battening still in place, though it was too far gone to use again. I did, however, manage to recover some sleepers which have gone back in. The test to decide which ones will "go again" is easy - if they wont snap in my figures and I cant get an end to disintegrate with finger pressure, its OK! I ran out of 13mm panel pins and started on the last of my stock of Nettlefolds 5/8" X No 19 panel pins inherited from my father. This started life as a box containing a whole pound, but now there are very few left - must get some more! I was visited by no less than three of the local robins - I thought there was only one! They were totally fearless and came within a foot or two of me as I worked on.
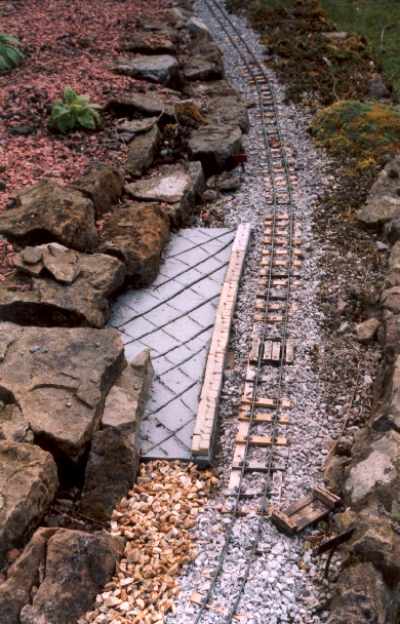
6th March 2003 Having got some more 1 mm drills and some ballast over the last couple of days, a short burst in the garden today. I only relaid two yards, but one of these included a foot crossing, currently the only one on the line. The timbers of this had survived remarkably well (as had some of the sleepers) so the length of 12 mm x 6 mm stripwood Id bought for the job wasnt needed. Never mind, itll still come in handy later. The concrete track base in this area is a little more uneven than I remember - I suspect theres been some ground movement over the years but any difference in level is coped with by the ballast. The foot crossing is at the site of what used to be known as Slugs Crossing (so named because they did) which is to become Lathkill Dale (for Over Haddon) under the new regime. This is going to get a new platform and building, using Jigstones. Ive got enough platform edgings in stock (good job really - cant put my hand on the mould at the moment) but Im wondering about the actual platform construction in concrete. Ive got to lay a concrete base for the platform as the existing concrete is at under-the-track-battens level (the old wooden platform merely sat on the loose stones in the area) but then Im wondering whether to build in situ (with all the problems of painting the stonework in the garden) or casting the platform (with the edges in place) in a wooden mould on the bench and fixing it in place with a mix of concrete and building PVA once its been painted. Advice, please! 14th March 2003 I ran into a problem today - I ran out of sleepers! Until Richard and Shirley (why do I always want to call them Richard & Judy??) get some in stock, Im snookered! I did seriously think about buying a pillar drill and making a jig to cut and drill my own, but I dont have the time. The next 4 yards to be lifted got de-ballasted and put back down, but they currently have a Hornby Trains look about them, as they only have about 5 sleepers per length - enough to hold the rails somewhere near gauge and for each panel of track to hold its shape, (except where I hadnt actually bent the rails to shape in the first place - some very early track, this!) Theres method in this: the last section of curve had actually got most of its battening and sleepers intact and sound, so with a bit of VERY gentle resleepering and a couple of chunks of battening, it went back down again. From here, Im going to be able to start remodelling the track layout in the station area, to give room for an island platform between the tracks and a longer loop. To do this, Ive got a fair amount of ready-battened track in stock, so can just lay this and lift the old stuff for rebuilding later, and the last length of curve provides the fixed point for this work to start from. Having said that, the two (non-Brandbright) points I lifted still had their sleepers intact - goodness knows what they were treated with - certainly not creosote! However, the battens (and the additional timbers for the point levers) were well and truly rotten, but rebattening is something I can do on the bench (or in the kitchen, or on the antique dining room table...............) 27th March 2003 I watched the bin men collecting and emptying my dustbin surreptitiously today, as yesterday I put three large containers of old ballast in it, making it weigh rather more than the Local Authoritys Health & Safety advisor thought was reasonable for a dustbin. The reason? Ive started the relay of the main station area and there was an awful lot of cr*p to get out of the way. As you know, Im currently flat out of sleepers, though a phone call to Brandbright confirmed that they ARE ready for me, so Im a little limited in what I can do. The first thing to do was to sort out my stock of track: apart from the Jubilee, Id got quite a lot of battened O gauge track, but had never sorted it out. 3 piles emerged: straights, curves and odd lengths. Once this was done the old ballast and track was lifted and I started to sort out the turnouts. One was fine, the other was just about passable. Both needed new sleepers to attach the point levers to, secured to the new battens. The Brandbright points need a complete re-sleeper, but two sets of those are coming at the AGM. Once the turnouts were fettled, I started to re-lay them in their new positions. Problem: the concrete track base in this area was somewhat bowl-like (well, not flat, anyway) so the turnouts wouldnt sit down properly. A short sharp attack with a bolster and a small Spanish lump hammer proved Id made my concrete STRONG - a longer attack eventually produced more-or-less the desired result without me hitting my finger/thumb/hand with the lump hammer. Once the points were in place and ballasted in, I laid out the straight "O" gauge track down the line of the platform road. This track is most definitely not narrow gauge - the sleepers are about 2" apart and there was another feature I hadnt noticed until yesterday. All the sleepers have a small hole on the centre line of the track. The fact that one still had a small round-headed brass screw in gave the game away; this track used to have stud contact electrification on it!
This will all need additional battening to keep the levels right, so a quick trip to B&Q got some more battening and some concrete (station platforms for the construction of) 6th April 2003After a good dose of retail therapy at the 16mm Convention yesterday (and a bit of boating this morning) back to work! Re-sleepering and battening the 4 yard stretch that was held together with just a few sleepers was reasonably quick and easy. Battening up the "vintage" track (with just short lengths attached alongside the existing, thinner, battens to keep the levels right) was followed by cutting a short length of Brandbright track to connect up with the turnout which is going to serve the other end of the passing loop. Needless to say, when I realised I was going to be short of battening, it was five past four.......... (Note for foreign readers: most shops in the UK close at four oclock on Sundays!)
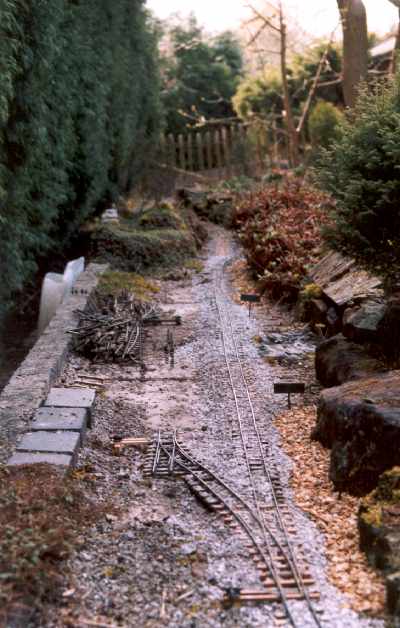
New track through what will be Alport Junction station - the pile of "rubbish" on the left hand side is the passing loop and sidings! I also changed the blade in the railways junior hacksaw, as it had both bent and twisted, making it more-or-less impossible to make a straight cut in anything. I was only using about two thirds of the blade, as well. We have 3 sets of tools: house tools, boat tools (these, oddly enough, stay on the boat) and railway tools, all of which saves having to try and remember where you last used a screwdriver Ballasting, levelling and packing was followed by the first bit of "decorative" work. Some of the trackbed area is rather wider than it needs to be for purely railway purposes. In these situations, I like to differentiate between railway lands and other land: to do this, I use a different coloured stone to my limestone ballast. I used to use pea gravel, but Ive now latched onto some stuff called Thames Valley Flint - its a yellow colour which contrasts well with the ballast and its a different texture, too.
Once all this was done, I realised that I could actually run a train - the first time thats been possible in years. Following a dose of ballast-picking-out-of-the-checkrails-and-point-blades, I collected the Friog and a couple of vans - no steam till the continuous runs been completed. I had to trim back the overgrowth in one or two places a bit more than I had, to clear my biggest vehicle (a W & L van) but otherwise the train ran well, with no lurches on the new track - my technique must be improving! We went through the tunnel for the first time, too: the curve at one end is very fierce, but my stock gets around it! I then cleared the rest of the trackbed of all the debris which my soon-to-be-felled willow tree deposits over that end of the railway. Ive got to up my order for turnout sleeper sets to four, as the one for the siding at Haddon is on the verge of disintegration - otherwise, just 16 yards to go and I get a main line back again! 8th April 2003 Yesterday was "put the magazine to bed" day - another of my interests. Today, after getting some more battening no less than five yards of track (from Drapers Platform round to what will become Haddon on the new MDLR) got completely re-laid. (Pause to get calculator). 286 scale yards aint bad for an afternoon - I doubt a 12" to the foot PW Gang would do as well. This all got ballasted and the rest of the trackbed got cleared, ready for re-laying. The only bits that havent been touched are the two turnouts - I want them to stay in place so I can run once the rests done and if I disturb em, that planll be shot. Its interesting to see on this last stretch how, where the plants have taken over, theyve created their own soil. Theres been as much of this to remove as ballast and decorative stone, in some places, but at least now were in "dog seeing rabbit" mode and the amount of work left is much easier to assess. One area which may be a problem is in the vicinity of Haddon station, where part of the trackbed has sunk badly leaving a step in the concrete track base about 1" high. Ill put the level on it and see how we can alter things to make the transition a little easier. Ive also laid the concrete base for the new platform at Lathkill Dale today. I added some quick-setting concrete to the mortar mix, as frost is forecast and I want it to go off quickly. It had gone off enough by early evening for me to remove the battening which had acted as shuttering and stand the Jigstones platform edgings in place.
The rest of the week saw the rest of the trackbed cleared of the old ballast and all the remaining track lifted. Some got re-sleepered, but an attempt to lay without battens was disastrous - as Richard and Shirley say, you need DEEP sleepers if youre not going to batten.
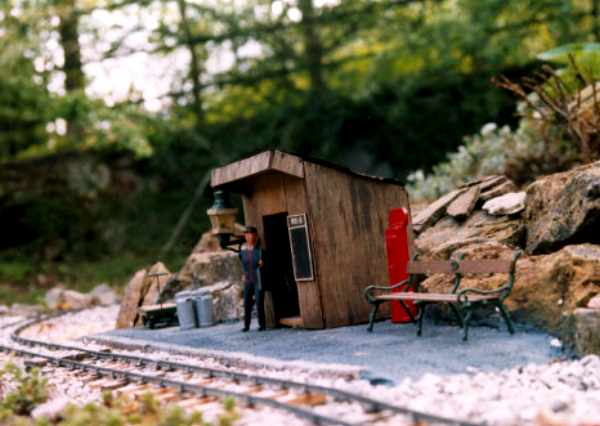
15thApril 2003 The Major Step in the concrete track base - it looked like a plate shift on a continental scale - was eliminated by hitting it with a VERY large chunk of cast iron with a wooden shaft on it - one of those old-fashioned drop it on the tarmac until its reasonably level devices that were much used for temporary road repairs until standards improved. There was a vast void underneath which was filled with old concrete and ballast, following which a new skin of concrete was applied. Otherwise, work in this area has gone on hold because of The Tree. Theres a willow at this end of the railway which Ive been wanting to get rid of for years, as it drops twiggy bits and leaves all over the trackbed and clearing it is a confounded nuisance. Now that its causing problems to next doors shed (and could do something similar to the gardens retaining wall) Ive got approval from The Domestic Authorities to get it felled, BUT............... we live in a Conservation Area, so have to have Council permission to fell it, which could take up to six weeks (when I get the form to fill in). I dont want to re-lay the track past the tree, as the tree surgeons caused havoc with their big, clod-hopping boots last time they were here, so Im going to re-sleeper it and put it to one side until theyve been. However, this enabled work elsewhere on the line to take place, so I built a bridge and made a start on some new buildings. In finding the photos for an article for Tag, I came across the original instructions for my Jigstones, together with the plans, so I started to build another lineside hut. The first layer of this has got laid (not without incident and a lot of filing to make the bits fit together snugly - was this the problem with Jigstones?) and Ive got the next layer partially prepared. Ive cast a new window frame, but the door from Mark I will go again - its beautifully weathered! 20th April 2003 I didnt intend to run a train today, honest! Todays aim was to complete the re-sleepering of the main line. Once this was done, I needed to join all the lengths of track up (including the couple of bits of straight that I just happened to drop in where the turnout goes at Haddon), just to be sure it would all go together. Of course, the temptation to see just what would happen with a light engine was too much, so the Friog was dragged out. Bearing in mind that there were some six yards of unbattened and unballasted track, it really wasnt too bad: some loose ballast chucked down where the worst lurches occurred cured the worst problems. It then seemed a Good Idea to see how the line ran with some stock................. there were a couple of spots which needed some attention (and two yards where Ive laid the track with the chairs the wrong way round - didnt half make the stock rattle!) but otherwise all ran well. Then the Friog ran out of battery. What was I to do?? Of course, the answer was obvious - get the steamer out! Unfortunately, this was the tracks undoing - literally! The heavier, faster steam loco moved the unbattened and loosely ballasted track summat terrible and we ended up with joints coming apart and track moving quite badly. Nevertheless, it was good to be running again. Once Id given up on playing trains I carried on with the track. The loco shed siding got sorted first, by virtue of the fact that there was a battened length of track ready to go in. This had been rejected for the main line as it must at some point have been trodden on, so that it wouldnt lie flat even when battened. This means that theres actually a one yard length of brand new track on the main line - the first piece Ive had to make up in ages! Once that was in, the passing loop got re-sleepered as far as the turnout which awaits rebuilding. I think Ive got enough vintage track In stock for all the sidings, so apart from re-battening and ballasting, were somewhere near done! At least I should be ready in very good time for my planned Open Day in July. 13th May 2003 The sleeper sets for my turnouts arrived last week (Thanks, Richard & Shirley) so today I was able to get on with rebuilding a turnout: the one on the main line which will allow access to Haddon yard. The first job was to sort the new sleepers into order. This is easy, as Richard stamps a sleeper number on the end of each one, so you sort from 16 down to 1. Only problem is, the last 3 are standard ones and arent numbered.......... I then had to find all the rail, sleepers and chairs from the old turnout. Most of this was still attached to the remains of the old sleepers and battening, but I was a couple of slide chairs short, using the one as yet undisturbed as reference. These turned up with the other turnout - things appeared to have got a little muddled! Once Id got all the clean bits into the kitchen (dont tell SWMBO!) I was able to put the two outside rails into place and transfer the slide chairs to their new sleepers. The big problem was all the soldered bits, which had nearly all come unsoldered. Cleaning up the brass plates (still attached to their old sleepers) was easy enough - blast with the gas blowtorch (outside) - scrape clean - use a fibreglass brush to get back to the bare brass - re-tin - detach from the (by now) fairly charred sleeper. A similar process cleaned the bottom of the rail but upon reassembly, it became obvious that this would not be enough, so the side of the rails got the same treatment in order that the whole could be re-soldered, indoors, using a soldering iron. A quick check with the roller gauge resulted in a little tweaking, the plates were fastened down to the sleepers and the whole re-battened. I nearly came unstuck when it came to adding the point lever, as I hadnt got any of the right sized wood in stock: a bit of second-hand but sound battening out of the shed, together with a recycled section of brass wire produced a working point, which was duly installed in its intended position before lunch today. Ive been assembling Jigstones walls for the new platform shelter at Haddon. To get a much more even-looking wall, Ive taken to assembling these brick side down on a flat surface. It doesnt matter too much if the inside is irregular, as these walls will get a skim of cement on the inside when the building is assembled, so it looks tidy. Ive discovered that the major problem with Jigstones is getting the thickness of each segment consistent. Too thick and the wall will never go together, so when I started casting again tonight (mainly platform edges, now I recovered the mould from the person to whom Id lent it) I took rather more care over this. The lineside hut has also got finished in the last week. The painting (mid stone all over, terracotta brushed on lightly to get a brick colour, and a thin wash of black to tone the whole thing down) was easy enough and the tin roof on a plywood base was easy enough once I remembered that the ply needs to go INSIDE the walls, so you only see the tin at the edge! I always heat my bits of bean tin up with the blowtorch, as this burns the tin off and allows it to rust much more quickly: it also gets rid of the bright shine. The building now sits outside, waiting for Mother Nature to take its course. 20th May 2003 Ive now got the platform at Lathkill Dale finished. Getting the concrete in wasnt too bad (apart from the need to keep the concrete off the stone edging, without covering it). Painting the front of the platform wall and the stone edging was another matter! Id elected to paint these in situ once the concrete had gone off, but of course this meant resorting to hands & knees! Of course, the fact that the ballast wasnt there helped an awful lot! Painting the actual platform to resemble tarmac was actually much easier than I expected. Id got a tin of Railmatch roof grey which had gone thick as they often do - dolloping this on and splashing some turps in the same general direction allowed it to soak into the concrete rapidly, producing a very effective (and hopefully weatherproof) surface.
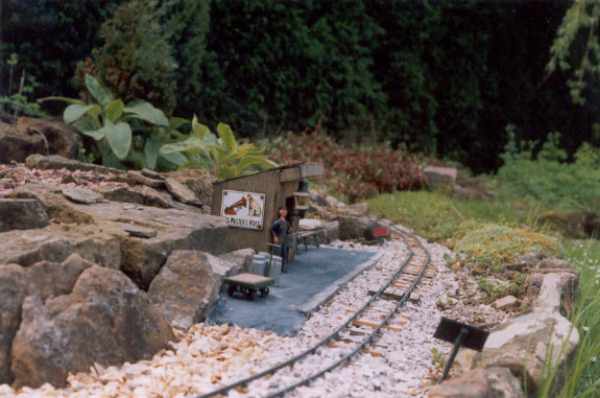
The "new" Lathkill Dale station. The building has always stood on this spot, but originally had a much shorter sleeper-built platform, rather than the much more commodius one now provided. Following a photographic session, attention was turned to Alport Junction, where another turnout was rebuilt. This time, it was the switch rail assembly which had come unsoldered, but this was much easier to put back together. Once this had gone in, together with the first bit of the passing loop, I sorted out which bits of track were going into the sidings, re-sleepered what I think at this stage will be my last yard of track and cleared all the surplus away. THAT made it look a whole lot tidier! 31st May 2003 Im a Lumberjack............ In the last week or so, Ive managed to get The Siding and loco shed spur at Alport Junction battened, laid and ballasted, and all the Jigstones edgings for the main platform there cast, as well as laying the base itself. Today was Tree Surgeon Day. He arrived at 0800, and by 0830 the track in the immediate vicinity of the willow tree (and Haddon station) had been swiftly lifted and laid down out of the way. It hadnt been laid properly, so this wasnt difficult. Felling the tree was not the standard lumberjacks one big cut and yell Tim-BER! exercise: oh, no! For a start, all the top stuff was cut off, leaving the basic trunk and big branches in place. Once the small stuff had been dragged out of the garden the branches were lopped off, starting with the smallest, followed by the trunk, until all that was left was a stump at ground level. This got treated with Ye Olde Creosote to ensure it wouldnt start growing again. The result is a much more open area which will be much more sunny in future. This should do the plants at this end of the line a great deal of good: whats there has had a dose of ruthless hacking back and the exposed rockery stone cleaned up ready for replanting with something a little better than the rather scrappy ground cover thats there at the moment. Most of the wood chips from the chain saw have also been removed, but more gravel will be required in the walking area at this end of the line - tomorrows job. Please click here to view the pictures of the felling 2nd June 2003At approximately 1900 today, services recommenced on the MDLR. I spent this morning getting the first instalment of the gravel for the walking area and laying it, and watching some of the coverage of the Coronation commemoration service: we actually had a telly to watch it, 50 years ago. This afternoon, the remaining sections of track got battened and ballasted. The ballast I had put down to get things running was removed as itd got contaminated with sawdust and wood chips from the chain saw and replaced with new. Once this was done, out with the level to pack the track where needed, then out with the Friog to start test running. There were odd problem spots and there are at least two places where I want to get the ballast out as we appear to have acquired a couple of gradients which werent there before, but after half-an-hours fettling, things had settled down enough for me to eat on the patio and just watch the train going by. Once reliable running was achieved, I went from Rebuilding Mode to Modelling & Maintenance Mode. The modelling bit was easy. Now that the railways been turned over to the Traffic Department, theres a need to indicate which tracks are still out of use: the main platform road through Alport Junction is out of use until the platforms finished and the sidings at Haddon arent even laid! These roads were marked off in the same way as on the Big Railway - with two stakes and some orange mesh across the track, the latter being courtesy of the LADS at the AGM. The Maintenance bit involved the Friog, which has been making gear noises for some time. A dollop of grease sorted THAT out. So, there you have it. Im not totally finished, but at least the line is up and running again and I can start to enjoy it once more. The jobs which do need doing are more modelling than rebuilding and so Ill enjoy adding things, rather than just rebuilding.
|


Updated on 17th June, 2003